In this tutorial, we’ll be looking at how to create an object in JavaScript. I’ve left no stone unturned, so this is pretty much the only tutorial you’ll need on this subject.
Alright then. Let’s dive right into it.
As you know, objects are used to create a real world representation in programs, and they have 2 parts: properties and values.
For instance, if we create a human object, that object can have a number of properties like eye color, hair color, height, weight, etc., and each of these properties will have values assigned to them.
We’re going to now look at various ways of creating such objects.
Just define it! Create JavaScript objects using Object literals
The easiest method to creating an object is by using an object literal. This is where you basically define the object and assign properties and values to them. This method is similar to creating an array and assigning value to it. Let’s look at how to do that:
Let’s create a human object and assign a bunch of properties and values to it now.
let human = {
	eye: 'blue',
	hair: 'brown',
	height: '180cm',
	name: 'John'
};
Here you go. I’ve created an object human, and given its eye color as blue, hair color as brown, height as 180cms and name as John.
Accessing object properties – dot operator
We have a full-blown object now. But how do you use it?
You can use the dot operator to access the property values of every object.
For instance, if you want to display the eye color of the object, this is what you’d do:
document.write("Eye color is: ", human.eye);
When we run this program, this is what we’ll get:
What if we want to display more than one value in the same sentence?
document.write(human.name + " has " + human.eye + " eyes and " + human.hair + " hair.");
If we run the above line of code, this is what we’ll get:

So, that’s how you access the properties of an object and display their values.
Changing property values using dot operator
But what if you want to change the values of certain properties?
You can use the dot operator to do that as well.
Let’s say I want to change John’s eye color from blue to green. Then this the line of code I’d add to my program:
human.eye = "green";
Now, if I try to display John’s eye color, this is what I’d get:
Creating a new property using dot operator
I can also create a new property and add it to the object:
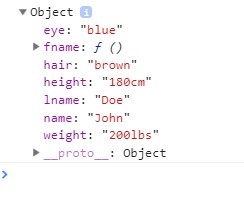
human.weight = "200lbs";
document.write("<br/> John's weight is " + human.weight);
I’ve added a new property called weight to the object and assigned it a value of 200 lbs. Now, when I try to display it, this is what I’d get:
If I now go to the Google chrome console (in developer tools) and try to display the object, this is what I’ll see:
{eye: "green", hair: "brown", height: "180cm", name: "John", weight: "200lbs"}
As you can see, weight has been added as the 5th property of the object.
Adding methods/functions to an object
Just like you can add properties to your objects, you can add methods as well. These methods are functions that can be invoked to perform certain actions.
Let’s create the same object as above, but this time, add a lname property that indicates the object’s last name.
Let’s also create a function called “fname” to calculate and display the full name of the object based on the properties already created.
var human = {
	eye: 'blue',
	hair: 'brown',
	height: '180cm',
	name: 'John',
	lname: "Doe",
	fname: function() {
		return this.name + " " + this.lname
	}
}
document.write("<br/> His full name is " + human.fname());
Do you see how the function was created? We are creating a method fname, and assigning a function to it. This isn’t a normal function though. We are declaring an anonymous function (function with no name assigned to it) and returning the concatenation of the string values inside the properties “name” and “lname”.
But we are not accessing them using the usual notations, which are human.name and human.lname.
Instead we are using the “this” keyword. We could do that because this function was created inside the declaration of the object “human”, so “this” here indicates the object.
So, this.name is essentially human.name.
Then, we are returning the concatenation of these two values.
While accessing this function we need to specify the object the function resides in and treat it as a function call, which is why we are accessing it as human.fname().
Notice how we didn’t have to give arguments in here. That is because this function pulls everything it needs from the “human” object.
When we run this program, we get the following output:
Accessing & adding properties using square brackets
You can also access the properties of an object with square brackets, with the properties written inside quotes. The quotes can be either single or double quotes.
alert(human["height"]);
If we run the above line of code, the following alert box will pop up on your browser:

You can also access properties using variables, like shown below:
var ht = "height";
alert(human[ht]);
In here, we are assigning the string “height” to the variable ht. So, we don’t necessarily have to use quotes while accessing the property “height”.
The above lines of code will result in the same alert box as the previous example.
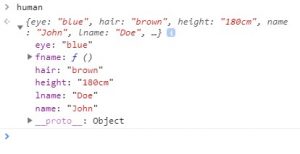
You can also add new properties to an object using the square brackets.
human["weight"] = "200lbs";
console.log(human);
If we run the above program and open the console in the developer tools, this is what we’ll see:
Do you see how the “weight” property was added to the list of properties of the “human” object?
Deleting properties
You can delete properties from an object by using the “delete” keyword.
Use the delete keyword, followed by the usual methods we use to access properties in an object.
delete human["weight"];
console.log(human);
If you run the above lines of code and look at the output in the console, you’ll notice that the “weight” property is missing from the list of properties.
We can also use the dot operator to delete a property. The following line of code will delete the “height” property.
delete human.height;
Create Javascript objects using the “new” keyword with the Object() constructor
Now, let’s look at how declaring objects with the “new” keyword and the Object() constructor.
It’s as simple as specifying the “new” keyword followed by the Object() constructor. This would create a new, but empty (undefined) object for you to play with. Let’s do that now.
var human = new Object();
In the example above, we created an empty “human” object. But this object does not have any properties or methods assigned to it. How do we do that? With the usual method, of course.
human.eye = "blue";
human.hair = "brown";
human.height = "180cms";
human.name= "John";
Using either the dot notation (like you see above) or the square brackets, you can create new properties and assign them values.
Then, you can access these values and display them, or modify them in any way you want, like you see below:
document.write(human.name + " is " + human.height + " tall and has " + human.eye + " eyes and " + human.hair + " hair.");
If we run the above lines of code, we’ll get the following output:
![]()
So, that’s how you use the Object() constructor to create objects and then properties within them. Isn’t it similar to using the Object literal method?
Just like with object literals, you can create methods in here as well.
Let’s define a last name property for the human object and assign it a value “Doe”.
Then, just like we did with object literals, let’s create an fname property, but assign an anonymous function to it.
human.lname = "Doe";
human.fname = function() {
	return human.name + " " + human.lname;
};
Do you see how we used human.name and human.lname to access the property values we want? This is one way of doing things.
But, you can stick to this.name and this.lname (like we did in the previous section) and achieve the same results as well.
document.write("<br/> His full name is " + human.fname());
As usual, you can access the value of this newly created method, or call this method by calling the relevant object and using the dot notation with the function call.
When we run these lines of code, we get the following output:
![]()
You might be wondering about the usage of square brackets while accessing object methods. Does that work? Let’s check.
document.write("His full name is.. " + human["fname()"]);
In here, I’ve tried to access the function using square brackets. When I run this code, this is what I’ll get:
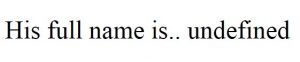
Unfortunately, we can’t access methods using the square brackets. If you try to do so, you’ll get an undefined, instead of the value you wanted to retrieve. So, stick to dot operators for Object methods.
Create Javascript objects using the “new” keyword with a function constructor (user defined)
In the above methods, we were only able to create one object at a time.
We created a single “human” object, and assigned its properties and methods. These were usually one person (John Doe).
If you wanted to create a new “human” object, you’d have to go through the process again, or replace the values of the current object, at which point you’ll lose the information you have on John Doe. Not an ideal situation, is it?
But what if you wanted to create 100s of human objects, with the same properties and methods? What if the only things that should differ here are the values you assign these properties for every object?
That’s where function constructors come in.
You can create user defined function constructors with common properties and methods and create and assign as many new objects with new values you want. Each assignment will only require a single line of code. Sounds good? Let’s look at how to achieve that.
Creating a function constructor is similar to creating a normal function. You specify the “function” keyword, then you specify the name of the function with 2 parentheses holding the arguments you want passed into the function.
Inside the function, you’ll run relevant commands.
Let’s create an object function constructor now.
Every function constructor needs to start with a capital letter. Ours is going to be “Human”.
Inside the parentheses, we are going to list the arguments we are going to pass from our function calls: fname to indicate first name, lname to indicate last name, eye to indicate eye color, hair to indicate hair color and height (in cms).
Inside the flower brackets, we are going to create the properties of the function.
I’ve already told you about the “this” keyword. This keyword is used to refer to the current element it resides in.
So, this.fname indicates the first name of “this” object, and so on.
Let’s assign the values we retrieved from the function call (the arguments sent to the function) to the object’s properties.
We can also create methods inside the constructor, just like we did with the previous methods.
Once everything’s done, this is how the function will look like:
function Human(fname, lname, eye, hair, height) {
	this.fname = fname;
	this.lname = lname;
	this.eye = eye;
	this.hair = hair;
	this.height = height;

	this.fullName = function() {
		return this.fname + " " + this.lname;
	}
}
Now that we’ve created the function constructor for the object, we can create our actual objects by calling this constructor and passing the relevant values.
Let’s create 2 objects to start with: human1 and human2.
Every time you create a new object, you need to declare it with the “var” keyword and assign the function constructor’s function call to it.
The function call should have the “new” keyword because we are indicating that we are creating a new instance (object) of the “Human” object constructor.
We’re going to be passing the values “John”, “Doe”, “blue”, “brown” and “180cms” to this function to assign the relevant property values to the human1 object.
var human1 = new Human("John", "Doe", "blue", "brown", "180cms");
If we try to call this new object (human1) in the console, this is what we’ll get.
console.log(human1);
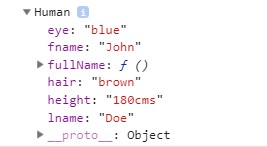
So, a new object “human1” has been created and it has all the properties assigned in the “Human” constructor with the values we sent during the function call assigned to it.
Similarly, we can create another object “human2” with a completely different set of property values.
var human2 = new Human("Jane", "Doe", "green", "blond", "160cms");
Your object names don’t have to reflect the constructor names. They can be any variable name, as long as they follow the variable naming conventions.
Now, let’s try to access the properties of these new objects and display them. Instead of using the “Human” constructor to access the properties, you can now directly use the “human1” and “human2” object names to access them because they represent separate objects now.
document.write(human1.fullName() + " has " + human1.eye + " eyes, " + human1.hair + " hair and is " + human1.height + " tall. <br/>");
document.write(human2.fullName() + " has " + human2.eye + " eyes, " + human2.hair + " hair and is " + human2.height + " tall.");
When we run the above lines of code, this is the output we’ll get:
![]()
Create Javascript objects using Object.create()
Syntax is as follows:
Object.create(prototypeObject, objectProperties)
In the above syntax, the prototypeObject is the object from which the new object is going to take properties, values and methods, and objectProperties is the additional properties (other than the ones taken from the prototypeObject) that the new object has.
The first argument, prototypeObject is compulsory. You need to specify either an object name or null on there. On the other hand, the second argument, objectProperties is optional, since you can always create new properties later as you see fit.
Note: Remember that Javascript is a case-sensitive programming language, so in this case, Object has a capital “O”.
We can create an object with the create method yet still not specify a prototypeObject. Let’s look at how to do that first, so you can understand the concept before we go deeper.
No prototype
So, to create an object using the create method, yet not use a prototype, you need to specify the value “null” in space of the prototypeObject’s name. Let’s look at how to do that:
var human = Object.create(null);
In the above example, we’ve created a new object “human” using the Object create method, but we’ve passed null in the place of the prototypeObject, and we’ve not given any new properties for the human object, so we’re ending the line of code with just one argument.
But, as I told you before, you can always create new properties for these objects once they are created. Let’s create some properties for the “human” object now.
human.fname = "Jane";
human.lname = "Dsouza";
You can also create methods for these objects.
human.fullName = function() {
	return human.fname + " " + human.lname;
}
Then, we can access these properties or methods in the same way we would with any other method.
document.write("Her full name is " + human.fullName());
When we run the above lines of code, this is what we’ll see in the browser screen:

This is one way of doing things. You can also directly create the properties and methods while creating the object. Let’s see how that works.
So, you need to create the object just like you created it before, and specify “null” in the place of the prototype object’s name.
Then, you need to create a flower brackets to create your properties, methods and their values.
The process of specifying your properties and methods differs a bit in here compared to the other methods.
In here, you’ll have to mention the property value first, followed by a semicolon ( : ), then specify the value of that particular object inside another flower brackets, with the syntax:
{value: “value”}
For methods, you’ll have to follow the same procedure, but in the place of the “value”, you’ll create the anonymous function that does whatever you need done.
This is how it works. Let’s look at an example now:
var human = Object.create(null, {
	fname: {value: "Steven"},
	lname: {value: "Hawkings"},
	fullName: {value: function() {
		return this.fname + " " + this.lname;
	}}
});
So, in the above example, we created an object using the create method and specified 2 properties and one method. Let’s try to access it now.
document.write(human.fullName() + " was a famous scientist");
When we run the above lines of code, we’ll get:
![]()
So, that’s how you create objects, assign properties, methods and values and retrieve and use those properties and methods using the “create” method.
Using prototype
Now, let’s look at using the Object create method with a prototype object.
As I told you before, the prototype object is another object from which our new object is going to model properties, methods and values.
Let’s create the prototype object first. This object can be created using any of the various methods we’ve seen in this tutorial.
var human = {fname: "John",
			 lname: "Stevens",
			 fullName: function() {
				 return this.fname + " " + this.lname;
			 }};
So, from the above example, we’ve created a prototype object “human” and specified it 2 properties and 1 method. You can name your object in any way you want. This is just an example.
Now, let’s create our new object using the create method.
var person = Object.create(human, {
	height: {value: "180cms"},
	weight: {value: "200lbs"}
});
We’ve created a new object called “person” and passed the “human” object as the prototype object. This means the person object also has the properties and methods of the human object. The person object has inherited the human object.
Then, we’ve created 2 more properties for the person objects: height and weight.
Now, let’s try to access them all and see if it works:
document.write(person.fullName() + " weighs " + person.weight + " and is " + person.height + " tall.");
When you run the above lines of code, this is what you’ll get:
![]()
As you can see from the above output, the person object was able to access the fullName() method of the human object, retrieve the values of the properties “fname” and “lname” and display it in the output.
This is how you create an object using the create method but inherit properties and methods from a prototype Object.
You can save a lot of lines of code and time using this method because you don’ have to keep creating the same properties and methods for every object. You can reuse them.
Create Javascript objects using ES6 classes
Now, let’s look at creating objects with ES6 classes. If you’re familiar with C++ or Java, you must know how classes work. But now, thanks to ES6, you can create classes in Javascript as well.
The syntax is very simple. Create a class which starts with a capital letter. In our case, our class is going to be “Human”.
Then, inside the flower brackets, create your properties and methods. This method is like when we used the function constructor to create a common constructor from which you created multiple objects.
This time, you’ll be creating a common class from which you can create multiple objects. Each of these objects will have the properties and methods you created inside the class.
In order to create your properties, you need to create a constructor function and accept relevant arguments from which you need to create your properties, similar to how you did with the function constructor.
Then, you can use the “this.propertyName = propertyValue” syntax to assign the argument values to the properties you create.
Here, “this” means the current object.
You can’t create methods inside the constructor though. You need to create them separately.
Let’s look at all of this in the following example:
class Human {
	constructor(fname,lname,eye,hair,height) {
		this.fname = fname;
		this.lname = lname;
		this.eye = eye;
		this.hair = hair;
		this.height = height;
	}

	fullName() {
		return this.fname + " " + this.lname;
	}
}
In the above example, we created a class “Human”. Then, we created a constructor function that accepted the values of first name, last name, eye color, hair color and height.
Then, we assigned each of these values to the properties we created.
Once we finished creating the properties, we created a method called “fullName” and concatenated the first and last name values to return the full name of the current object.
That’s it. Now that we’ve created the function, let’s look at how we can use it to create various objects.
var human1 = new Human("John", "Doe", "blue", "brown", "180cms");
var human2 = new Human("Jane", "Doe", "green", "blond", "160cms");
We created 2 different objects that pass completely different property values above. Let’s output the human2 object, and see what we get.
console.log(human2);
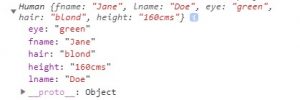
Great! So, our object was created based on the properties and methods mentioned in the “Human” class.
Now, let’s try to access the fullName() method from both of these objects.
document.write(human1.fullName() + "<br/>");
document.write(human2.fullName() + "<br/>");
The output is:

You don’t really have to stick to the methods and properties created in the class. You can create separate properties and methods for the objects you create as well.
Let’s create a weight property for our human1 object, and create a getWeight method that retrieves and outputs the weight of that object.
human1.getWeight = function(weight) {
	this.weight = weight;
	alert(this.fullName() + " weighs " + this.weight);
}
Now, let me try to call the above method.
human1.getWeight("200lbs");
This is the output I’ll get:

That’s it! I’ve covered pretty much everything you need to know about creating and accessing objects in Javascript in here. That was a long tutorial. I hope you enjoyed it.